Secrets to Crisp Puff Pastry Fruit Tarts with Ricotta Filling
Imagine a bite-sized marvel: a golden, impossibly crisp pastry shell, cradling a rich, velvety ricotta cream filling, crowned with a vibrant medley of fresh, seasonal fruits. This isn't just a dessert; it's an experience – a perfect symphony of textures and flavors that delights the senses. If you've ever dreamt of creating such masterpieces in your own kitchen, you're in the right place. Unlocking the secrets to truly exceptional
puff pastry fruit tarts with ricotta cream filling is simpler than you might think, and we're here to guide you every step of the way to achieve that professional-level crispness and sublime creaminess.
These individual desserts are a fantastic choice for brunches, parties, or simply an elegant treat at home. Their appeal lies in their elegant presentation and the delightful contrast between the delicate, flaky pastry and the luxurious, yet light, sweet ricotta. Let's dive into how to perfect each component.
The Heart of the Tart: Crafting the Silky Ricotta Cream Filling
The filling is arguably what truly elevates these tarts, transforming them from simple fruit pastries into something truly special. A well-made ricotta cream is rich, smooth, and delicately sweet, providing the perfect counterpoint to the buttery pastry and tart fruit.
The secret to a superior ricotta filling begins with your choice of cheese and its preparation. Opt for
whole milk ricotta cheese for the best flavor and creaminess. The most critical step?
Straining the ricotta. Ricotta, especially from the container, holds a significant amount of excess liquid. Failing to remove this moisture will result in a runny, less flavorful filling that can also make your pastry soggy.
To strain effectively, simply spoon the ricotta onto several layers of paper towels, then wrap and gently press to extract as much liquid as possible. You might be surprised by how much water comes out! This ensures a thick, luscious base for your cream.
Once your ricotta is prepared, the rest of the filling comes together beautifully:
- In a medium mixing bowl, whip 1/2 cup heavy cream with an electric hand mixer on high speed until soft peaks form. Gently fold in 1/4 cup powdered sugar and continue whipping until stiff peaks develop. Set this aside; it's crucial for the filling's airy texture. Remember to keep your heavy cream very cold for optimal whipping results.
- In a separate bowl, whip 6 oz softened cream cheese until it's light and fluffy, about a minute. Softening the cream cheese beforehand is key to preventing lumps and ensuring a smooth final texture.
- Add the remaining 1/2 cup powdered sugar and 1/2 tsp vanilla extract to the cream cheese, mixing until just combined.
- Finally, add your strained ricotta to the cream cheese mixture and whip for another minute until fluffy and thoroughly incorporated.
- The grand finale: gently fold the whipped cream into the ricotta and cream cheese mixture. This step is delicate; folding rather than beating preserves the airiness of the whipped cream, ensuring your filling is light and not dense.
Cover and chill the filling for at least an hour. This not only allows the flavors to meld but also firms it up, making it easier to pipe. For best results, use the filling within the day; it's a fresh dessert meant to be enjoyed promptly. While a quick-and-easy alternative of just cream cheese, sugar, and milk might suffice in a pinch, taking the time to prepare this luxurious ricotta cream truly makes all the difference in achieving that signature taste and texture. For an even deeper dive into this delightful component, explore our guide on
Crafting the Perfect Ricotta Cream for Puff Pastry Tarts.
Mastering the Puff Pastry: Achieve Golden Flaky Perfection
The "puff" in puff pastry is no accident; it's the result of carefully layered dough and butter, which, when baked at high heat, creates hundreds of airy, flaky layers. While making puff pastry from scratch is a labor of love, high-quality store-bought frozen puff pastry sheets offer an excellent shortcut without compromising on results.
The key to a crisp pastry lies in proper thawing, handling, and baking:
- Thawing: Remove your two sheets of frozen puff pastry (approx. 17.3 oz total) from the freezer and let them thaw for about 20-30 minutes at room temperature. The pastry should still be cold and hold a fairly stiff shape, but be pliable enough to unfold without cracking. Over-thawing will make it sticky and difficult to work with, potentially compromising those precious layers.
- Cutting and Scoring: Preheat your oven to 400°F (200°C) while the pastry finishes thawing. Unfold each sheet and cut it into nine squares, using the pre-folded lines as a guide. For each square, use a sharp knife to gently score a smaller square inside, about 1/2-inch from the edge, without cutting all the way through the dough. This creates a border that will puff up dramatically, forming a "well" for your filling.
- Preparation for Baking: Transfer the scored pastry squares to baking sheets lined with silicone mats or parchment paper, ensuring at least 1 1/2 inches of space between them. For optimal puff, keep one sheet of pastries chilled in the refrigerator while the first batch bakes. This prevents the butter in the pastry from melting prematurely, which can inhibit its rise.
- Egg Wash and Sugar: Before baking, brush the pastries with an egg wash (one large egg mixed with 1 tablespoon water). This gives them a beautiful golden sheen and helps the granulated sugar (about 1 1/2 tablespoons sprinkled over the tarts) adhere, adding a delightful crispness and subtle sweetness to the crust.
- Baking and The "Collapse" Secret: Bake for 10-15 minutes, or until the pastries are well puffed and deeply golden brown. Immediately upon removing them from the oven, gently re-cut along the scored inner square using a sharp knife. This crucial step allows the puffed center to collapse slightly while still warm, creating the perfect pocket for your ricotta filling and ensuring the base remains crisp. Repeat this process with your second chilled sheet of pastries.
- Cooling: Transfer the baked pastry shells to a wire rack to cool completely. This prevents condensation from building up underneath, which could lead to a soggy bottom.
Assembly & Presentation: Bringing Your Tarts to Life
With your perfectly crisp pastry shells and silky ricotta filling ready, the grand finale is all about assembly and presentation. This is where your individual
puff pastry fruit tarts with ricotta cream filling truly come alive.
The golden rule for maintaining crispness:
pipe the filling into the pastry squares just before serving. While the pastry itself can be baked ahead of time, adding the moisture-rich filling too soon will inevitably lead to a soggy crust. Aim to assemble them no more than 1-2 hours before they are to be enjoyed, keeping them chilled until serving time.
Transfer your chilled ricotta cream filling to a piping bag fitted with either a star or round tip. A star tip adds a beautiful decorative flourish, while a round tip creates a smooth, elegant dollop. Carefully pipe a generous amount of filling into the collapsed center of each pastry shell.
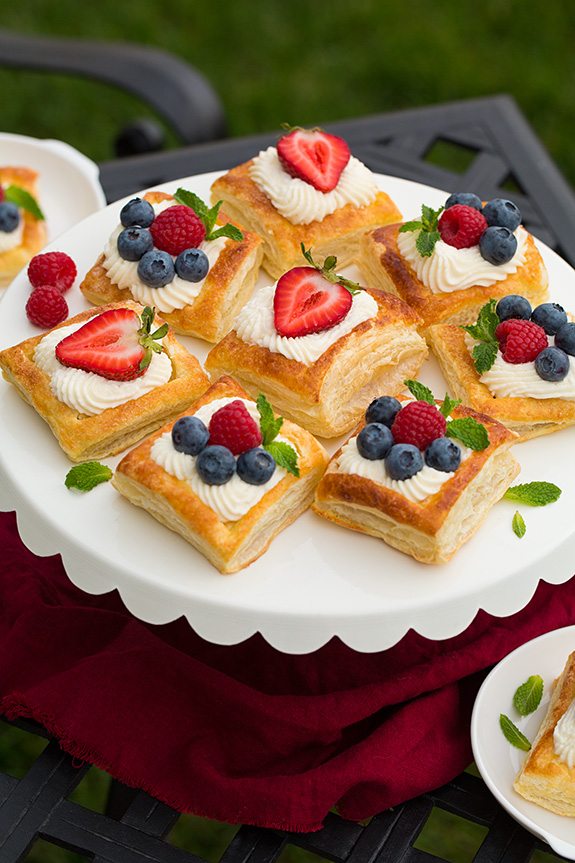
Now for the vibrant crown: fresh fruit. The classic choices are blueberries, raspberries, or sliced strawberries, but don't limit yourself! Consider other seasonal delights like thinly sliced kiwi, segments of mandarins, or small cubes of mango or peaches. The key is to use fresh, ripe fruit that adds a burst of natural sweetness and a hint of tartness. For an added touch of elegance and freshness, garnish with a few small sprigs of fresh mint leaves. The green offers a beautiful visual contrast and a subtle aromatic lift.
Serve your exquisite tarts chilled. The coolness of the filling combined with the crisp pastry and fresh fruit creates a truly refreshing and indulgent experience. For more insights into how these elements beautifully come together, take a look at our article:
Indulge in Puff Pastry Fruit Tarts with Rich Ricotta Cream.
Troubleshooting & Advanced Tips for Perfect Tarts
Even with the best instructions, baking can sometimes present challenges. Here are a few common issues and tips to overcome them:
- Soggy Pastry: The most common culprit is adding the filling too early. Always fill just before serving. Also, ensure your ricotta is well-strained and that your pastry is thoroughly baked until deeply golden and crisp. Cooling on a wire rack is crucial to prevent steam from getting trapped.
- Filling Too Thin: This usually points back to insufficient straining of the ricotta. Ensure you press out as much liquid as possible. Over-whipping the cream cheese can also make it too soft, so whip only until fluffy.
- Pastry Not Puffing: Make sure your oven is preheated to the correct temperature. If the oven isn't hot enough, the butter layers won't create enough steam to lift the pastry. Also, avoid over-handling the puff pastry as warmth from your hands can melt the butter. Keeping part of the pastry chilled until just before baking helps maintain its integrity.
- Flavor Variations: Don't hesitate to experiment! Add a touch of lemon or orange zest to your ricotta filling for a citrusy brightness. A thin layer of fruit jam (apricot, raspberry) spread on the pastry base before adding the ricotta can add another layer of flavor. A dash of almond extract in the filling also pairs wonderfully with many fruits.
Conclusion
Crafting these stunning
puff pastry fruit tarts with ricotta cream filling is a rewarding endeavor that yields truly impressive results. By paying close attention to the details – from the meticulous straining of the ricotta to the precise handling and baking of the puff pastry – you can consistently achieve that perfect balance of crispness, creaminess, and fresh fruit flavor. Whether you're hosting a sophisticated gathering or simply treating yourself to a delightful homemade dessert, these tarts are sure to impress and satisfy. So, gather your ingredients, embrace the process, and prepare to enjoy the sweet success of your perfectly crafted individual fruit tarts.